

Docs · Community guides (2025)
Guide for contributers new to Github
website/content/docs/guide-for-contributers-new-to-github.mdEdit on GitHub
Time required: ~5-10 Minutes
Welcome to the team! You don't need to be a professional programmer to help us build this mod. We use a system called GitHub to manage our files.
Think of GitHub like "Google Docs for Code." It tracks every change anyone makes so we never lose work.
Here is how to get set up and send us your first change (called a "Pull Request") in 8 simple steps.
Part 1: The Setup
1. Get the Account & Tool
We use a program called GitHub Desktop. It is a visual app that handles all the hard work for you.
- Create an account: Go to github.com and sign up (it’s free).
- Download the App: Go to desktop.github.com and download GitHub Desktop.
- Install & Sign In: Run the installer. When it opens, sign in with the account you just created.
2. Get Our Files (Cloning)
"Cloning" just means "Downloading a connected copy." You are copying our mod from the internet to your computer.
- Open GitHub Desktop.
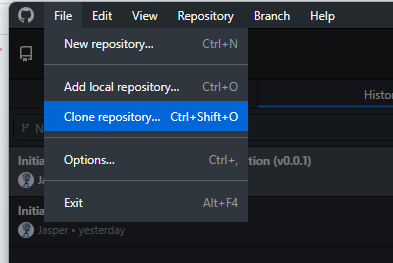
- Click File (top left) -> Clone repository...
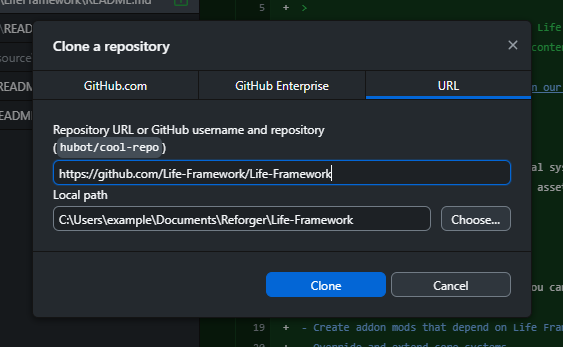
- Click the URL tab.
- Paste our Repository URL: https://github.com/Life-Framework/Life-Framework
- Local Path: Choose a folder on your PC where you want the mod to live (e.g.,
C:\Games\ArmaReforgerMods\LifeProject). - Click Clone.
Part 2: Making Your Change
3. Create a "Branch" (Safety Zone)
Never work on the "main" branch. Imagine "main" is the live version of the game. You want to work in a parallel universe so you don't break anything while you experiment. This parallel universe is called a Branch.
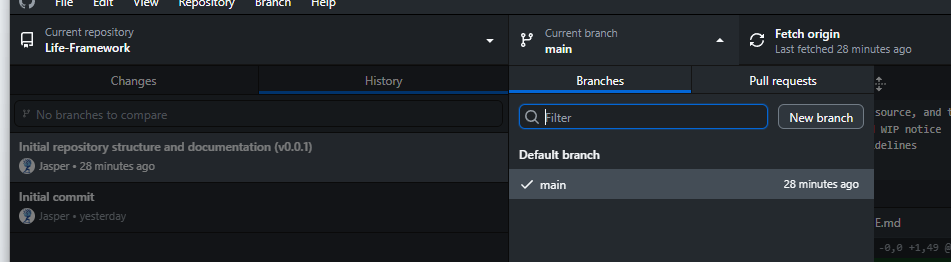
- In GitHub Desktop, look at the top bar where it says Current Branch.
- Click it and select New Branch.
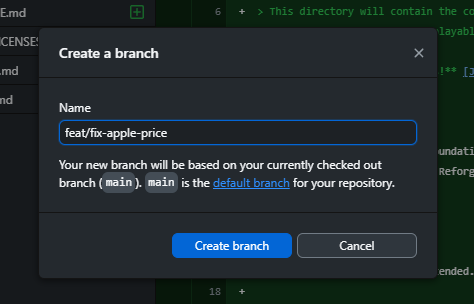
- Name it something that describes what you are doing (e.g.,
feat/fix-apple-priceorfeat/add-loading-screen). - Click Create Branch.
4. Edit the Mod
Now, go to the folder on your computer where you downloaded (cloned) the files.
- The Task: Let's say you want to change the price of an Apple in our config file.
- The Action:
-
Open the file (e.g.,
Configs/Items/Apple.conf) using a text editor (Notepad, VS Code) or the Enfusion Workbench if you have it installed. -
Find the line
Price = 5. -
Change it to
Price = 10. -
Save the file.
-
Part 3: sending It Back
5. Review Your Work
Go back to GitHub Desktop. You will see the file you just edited listed on the left sidebar.
- Green lines: Things you added.
- Red lines: Things you removed.
6. "Commit" (Save to History)
A "Commit" is like a checkpoint in a video game. It saves your changes to your local history.
- Look at the box in the bottom left corner.
- Summary: Type a short name for your change (e.g., "Updated Apple Price").
- Description: (Optional) "Changed price from 5 to 10 for balancing."
- Click the blue button: Commit to [your-branch-name].
7. "Push" (Upload)
Right now, the change is only on your computer. You need to send it to the cloud.
- Click the blue Publish Branch (or Push Origin) button at the top right.
- Wait for the loading bar to finish.
8. The "Pull Request" (PR)
This is the final step! You are formally asking the project owners to "Pull" your changes into the main game.
- After pushing, you will see a blue button in GitHub Desktop that says Create Pull Request. Click it.
- This will open your web browser to our GitHub page.
- You will see your title and description.
- Click the big green Create Pull request button.
🎉 You're Done!
You have successfully submitted code to the project.
- Our team will get a notification.
- We will review your code.
- If everything looks good, we will click Merge, and your change will be in the next update of the mod!